05.08.2009

DIY Project = The perfect dirty T

filthy-me.jpgimg_3230.jpg
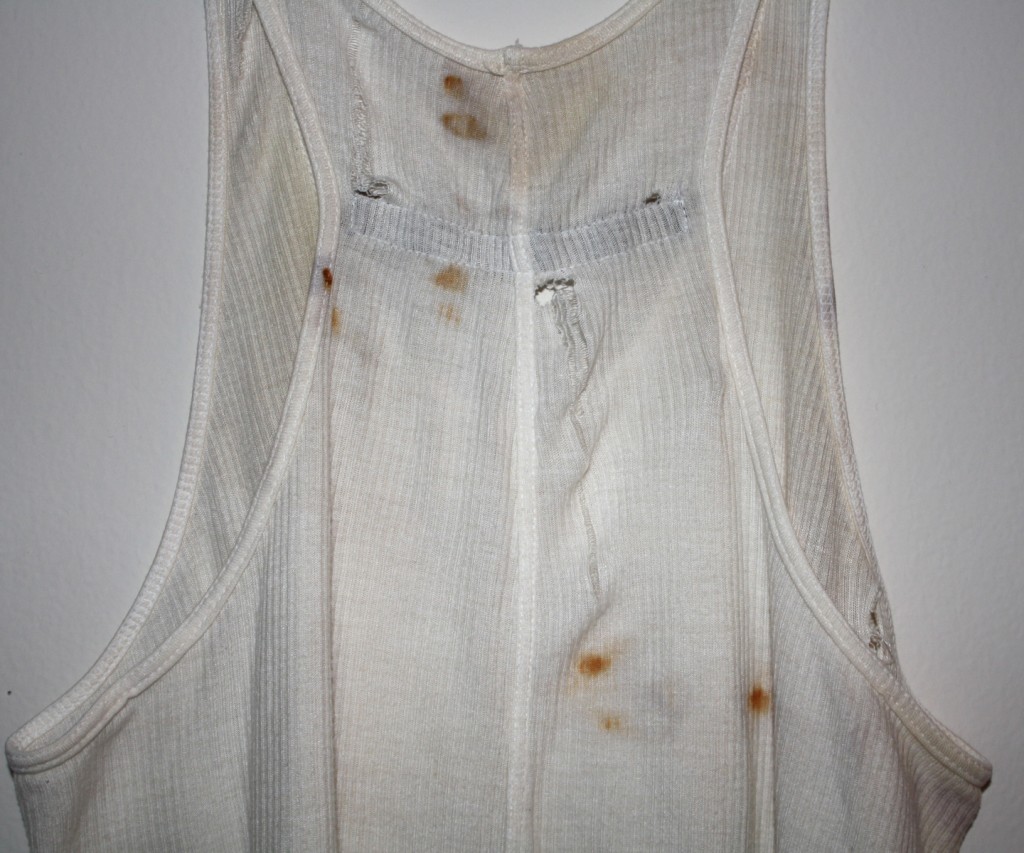
It’s really hard to get things this perfectly dirty. It took me a week to get here!!! I started out with a clean tank. I let it sit in a tea bath for 1/2 day to get an overall yellow look. Then I let it sit with some pre-rusted pennies and nails/screws for 3-4 days. Last I let only the top and bottom sit in more tea for another day. After all of this, don’t throw it in the wash right away. Let it sit in the sun for a few hours. Then go ahead and wash - but make sure it’s cold wash.

(BLEACH BLACK)

14.07.2009

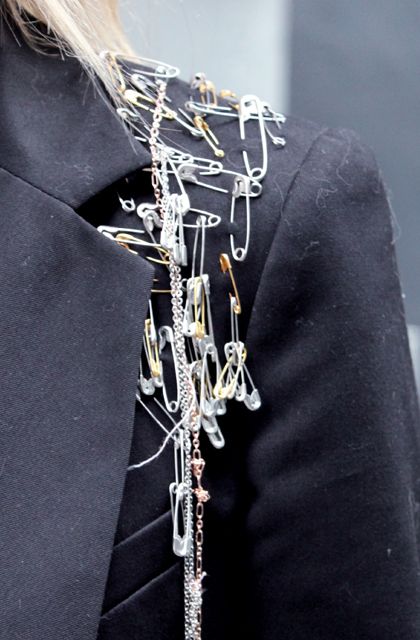
DIY Project = The safety pin chain

(COCOROSA)

DIY Project = The Spiked Denim Vest

c5.jpgc4.jpgc31.jpgc1.jpgc2.jpg

28.06.2009

DIY Project = The Chain Bracelet

So i made these medieval “wrapped yarn” bracelets, after being inspired by yarborough jewelry’s collection, as profiled below!

start with:

(x3) bracelets of your choice…i recommend different sizes.

(x1) skein of lion brand yarn

(x10) (3/8″) pyramid suds

(x10) “O” rings

(x1) 45″ of chain (or less)

Chain bracelet: wrap the yarn tightly around the bracelet- secure with tight knots, at interior.  Place the “O” rings on your bracelet, about 1″ and 1.5″ apart- drape the chain between- secure and close thru “O” rings.

Stud bracelet: place the studs randomly, along the bracelet.  Tuck prongs into yarn- press to secure w/ thumbs, and prongs will close on impact pressure.

Good luck !

xox valerie (Bleach Black)

DIY Project = The Body Chain

chainmail1

So i finally finished my diy body chain…inspired by both “bliss lau” and “erin wasson’s low-luv” respective collections, i set out to make my own…the result reads “part-time knight at medieval times, goes to the renaissance faire”…(i’m kinda’ feeling it!? )

I made this project a lot harder than it needed to be, as i wove “mini chain” thru the “medium chain”, as i wanted a traditional medieval chainmail effect.  You could skip that step, and save yourself about 4 hours.  total project was about 5 hours, but could be as little as 1 hour, should you skip the weaving…

Start with:

  • medium chain (x2) lengths of 42″ chain (84″ total)
  • (optional) mini chain (x2) lengths of 52″ chain (104″ total)
  • large chain (4″) for front horizontal drop
  • large chain (6″) for front vertical back connecting chain
  • (x1) package of “O” rings- use for connecting chain
  • small pliers
  • sharp scissors or cable cutting pliers (lineman’s pliers)

Weave mini chain thru medium chain (optional), cut lengths as advised above.  use “O” rings to secure mini chain, within medium chain.  Trim excess mini chain, after secured with “O” rings.  drape the chain on yourself in a mirror, and play with the placement.  Secure chain w/ “O” rings.  You can also open he chain, and close with pliers, for a more “finished/ professional” effect, if you have the right tools.

Good luck !

valerie x bleachblack.com

Obsessed with Spikes = A DIY Project inspired by Bleach Black

sss1.jpg

23.06.2009

DIY Project = The chain-link headpiece

chainheadressfront-thumb-150x200.jpgchainheadressback-thumb-150x224.jpgAt the risk of looking like a dungeons & dragons maiden, I've crafted this chain-link headpiece, sure to be the envy of my next (first?) Renaissance Fair.

Start with:
(x1) Medium chain
(x1) Larger link chain
(x1) Smaller link chain
(x1) Pliers

Measure the perimeter of your head (top of forehead to lower back head).  Mine is (22") total (my head is MASSIVE, by the way). Use (x1) medium chain.

Measure the same amount, i.e.: (22"). Use (x1) larger link chain.

Measure the distance from center top of forehead, to lower back head. Mine measures (13.5"). This piece will lay along your center hair part, linking the center front of the medium chain, to the center back of the medium chain. Using your pliers, open the links, hook together, and secure them closed with pliers.

Affix your (x1) larger link chain, at the center front. Using your pliers, open the links, hook together, and secure them closed with the pliers. This piece is not connected at the center back, so it just drapes loosely. The center front should link all (x3) sizes of chain together.

--Valerie
BleachBlack.com

DIY Project = The Havaianastud

havianadetailhavianabefore-copy

With summer quickly approaching, and kristin and i beyond bored with re-hashed gladiator sandal offerings, i’ve reverted to my trusty havianas and attacked said flip flops, with…you guessed it…studs!

start with:

(x1) crop-a-dile hole punch set

(x4) mini hex spikes, (x8) medium hex spikes, (x2) large hex spikes (all via studs and spikes)

(x1) flathead screwdriver

(x1) pair of havianas sandals

use your crop-a-dile to punch holes, spaced (3/4″) apart.  place large hex spike at toe center point of strap.  use flathead screwdriver to twist male end of screw, to secure.  repeat again, with (x3) holes on either side of strap, working from larger studs at center of strap, to smaller studs at end of strap.

enjoy !

x valerie

22.06.2009

DIY Project = Fringed sweater

picture-35picture-51

With this chanel sweater as my impetus, i set out to re-create the sleeves with a $3.00 vintage sweater…

Start with:

(x1) vintage sweater, (x1) sharp scissors, (x2) skeins of yarn, (x4) pieces of taffetas (12″ x 2″) each, (x1) roll of fusible webbing, straight pins, needle and thread.

Use your scissors to cut sleeves off to desired cap sleeve length, fold under (1/2″) with needle and thread (via hand) to secure.  repeat with cuff, which will act as a bracelet for the yarns at the bottom.  throw away balance of the sleeves.  cut lengths of yarn, so that yarn will be long enough to drape over cuff…(mine was approx 21″).  Use (x1) skein per sleeve.  once cut, align 6 pieces of yarn together, and wrap flat with fusible webbing.  insert fusible webbing, into folded taffeta “tracks”, like a sandwich.  secure with iron.  repeat.  insert taffeta tracks, under cap sleeves, and ease into place.  secure with needle and thread (via hand).  repeat at cuff.

This takes a long-ass 5 hours, so make sure you’ve got a good movie…

xo- valerie

Alexander Wang Lace Dress

AWAN-WD8_V1.jpgAWAN-WD8_V1d.jpgAWAN-WD8_V3.jpgAWAN-WD8_V3d.jpgAWAN-WD8_V2.jpgAWAN-WD8_V2d.jpgAWAN-WD8_V4.jpgAWAN-WD8_V4d.jpg

Toutes les notes